Required terms checkbox
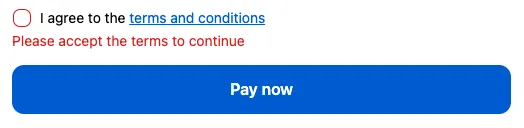
What you’ll build: an “I agree to the terms and conditions” checkbox above the Pay now button. Checkout can’t be completed until it’s ticked.
Requirements: Shopify Plus. A form with only this checkbox is on the Free plan.
Screenshot needed
An unticked 'I agree to the terms and conditions' checkbox above Pay now, with the error 'Check this box to continue'
Custom fields form from the Terms agreement template, label with a link to the terms; click Pay now without ticking.
-
Create the form. On the Fields tab, click Create customization, choose Custom fields, then the Terms agreement template. It has one required checkbox.
-
Change the checkbox’s Label to link to your terms:
I agree to the [terms and conditions](https://yourstore.com/policies/terms-of-service) -
Its Cart attribute key is
Terms accepted(orTerms accepted 2if another form already uses it). This is the label for the answer on the order. -
To change the error customers see, write your own under Message if unchecked.
-
Under Status, turn on the switch so it reads Published, save, and note the Form ID shown there.
-
-
Place it. In the Checkout Editor, add the Custom fields app block just above the payment button (or anywhere on the payment step). If you have other Custom fields forms, enter this form’s ID in the app block’s Block IDs. See which forms an app block shows.
-
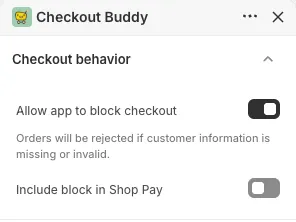
Allow it to block checkout. In the same app block’s settings, turn on Allow app to block checkout (under Checkout behavior). Without this, the checkbox shows but customers can pay without ticking it. Save the Checkout Editor.
-
Test it. Try to pay without ticking the box: you should see Check this box to continue (in French for French-language checkouts), or your own message.
The answer is saved on the order under Terms accepted with the value true.
Variations
Section titled “Variations”- Only for some orders: under Who sees it, choose Only checkouts that match conditions, for example Cart contains → any of your custom-made products.
- Express checkouts too: the required box stops only the Continue and Pay buttons. To refuse Shop Pay, Apple Pay and other express orders without the box ticked, click Add checkout rule in the form’s Checkout rule card, which needs the Deals & Rules or Buddy plan. See checkout rule for a required checkbox.
- Several checkboxes: add more Checkbox fields to the same form, one per statement. A form with more than one field needs the Buddy plan.
- Pre-ticked marketing checkbox: tick Ticked to start on the field. Don’t pre-tick terms that customers must actively accept.
Troubleshooting
Section titled “Troubleshooting”- Customers can pay without ticking: check Allow app to block checkout is on for the Custom fields app block, and that the form is published and listed in Block IDs if you use them.
- The link doesn’t work: use the format
[text](https://…)with the full URL. Clicking the link opens it without ticking the box. - Only links work in the label. Bold text in the checkbox label shows as plain text.
- The error message is in the wrong language: our own message, Check this box to continue, comes in English, and in French for French-language checkouts. For other languages, write a Message if unchecked on the checkbox and translate it under Translations.
Forms made before October 12, 2026
Section titled “Forms made before October 12, 2026”A terms checkbox made before then is an older Checkbox block: see choice fields. It’s placed in a Checkout Buddy (v1) app block with its ID in Fixed block ID, needs Allow app to block checkout the same way, and shows the Error message set on the block.